Repairing Your Boat’s Fiberglass
The great thing about fiberglass is that even the worst damage can be repaired. All it takes is some fabric, resin, and equal parts care and skill. Mask the area around any scratch, gouge, or hole. This will protect the surrounding area from inadvertent gel coat or sanding.
 Unlike scratches and gouges, holes in your fiberglass boat hull require a more thorough repair than applying a gel coat. They also pose a significant risk to the structural integrity of your vessel. Fortunately, you can repair most holes with patience and the right materials. If your repair is more extensive, visiting a shop specializing in boat repair is best.
If an area of your fiberglass boat’s skin feels soft when pressed upon, there is likely a gap between the skin and the core. This is a dangerous situation and should be repaired as soon as possible. The first step is to identify the affected area. This is usually done by sounding the hull with a hard mallet. Solid glass gives a crisp tone while delaminated glass will resonate with a duller, muted sound. Once the sounding is completed, a drill can mark the areas where a hole has occurred.
Once the damaged fiberglass has been identified, removing all gel coat covering the delamination area is important. Acetone is a good thinner for this purpose. If the damage is very large, the gel coat may need to be cut away with a jigsaw or grinder. Next, the damaged areas must be prepared for re-bonding to the fiberglass core. This is achieved by grinding the area flat to a 1/2 inch or more thickness. It is also necessary to grind an angle into the existing fiberglass on any stringers (the structural members that run along the length of a boat). This bevel must match the original in both size and shape. The bevel should be ground to a 12-to-1 angle which will provide sufficient surface for the new fiberglass to bond to.
It is also recommended to clean the repair area thoroughly with acetone prior to applying any new gelcoat or epoxy to prevent a chemical reaction between the different materials. It is important to use the same brand of polyester or vinylester resin when repairing delaminations, as this will ensure that the chemicals are compatible and will react properly. A catalyser such as methyl ethyl ketone peroxide, or MEKP, is required for the proper chemical reactions to occur.
Once the area has been cleaned, it is important to apply a fresh coat of gelcoat to the fiberglass. Once it has dried, it is recommended to use 600 grit wet sandpaper or higher to blend the new gelcoat with the old to create an invisible repair. Lastly, a coat of wax should be applied to help protect the repair and keep it shiny.
A gouge, unlike a scratch or a crack, goes all the way through the fiberglass layers and into the core. It’s a very serious damage and requires special care to repair, but it can be done. If left unattended, a gouge can leave your boat vulnerable to water penetration and much worse long-term hull damage.
The first step in repairing a gouge is to prepare the area. Use acetone to remove the gelcoat layer over an area twice as large as the damaged area. This will give you the opportunity to assess and correct any low spots that need filling. If the gouge is deep, it may be necessary to remove the core and replace it with new fiberglass or foam.
If the gouge is shallow, a chopped mat layer can be used to fill the hole and restore the structural integrity of the hull. Make sure the chopped mat is a good match with the surrounding fiberglass. The next step is to mix a gelcoat base and catalyst according to the product instructions. A 2-to-1 ratio of gelcoat base to catalyst should be sufficient, but check the product’s directions carefully. If the gelcoat is too thick, it will not cure properly; if it’s too thin, it won’t adhere to the fiberglass.
Once the gelcoat has been mixed and applied to the area, sand down the patch until it is in plane with the surface of the rest of the fiberglass. Clean the area and mask it, leaving about 2 inches of open space around the repair area. This will protect the area from inadvertently applied gelcoat and sanding debris.
Finally, a topcoat of pigmented resin can be used to color the repaired area and hide any gelcoat imperfections. This step will be easiest if you can find a white tinted resin that matches your hull. If you’re working with other colors, the process will be much more difficult, since small tint quantities need to be metered precisely. It’s worth trying to find a matching gelcoat tint to avoid the hassle of mixing a new color from scratch.
Small cracks, scratches and dents may seem minor at first but they can grow and become serious structural problems if left unchecked. Typically they occur in areas of the boat that experience unusual stress, such as rub rail collision zones and transom corners where hardware is mounted. It is also common for them to form where heavy items are loaded and dropped. Blisters are also a major problem that can develop on full fiberglass boats. These air-filled flaws can let in water droplets and expand as they do so. If they are left unchecked, blisters can grow to the point where the core materials will begin to soak and rot.
To repair a scratch or ding, first use 80-grit sandpaper to roughen the surface and open up the crack or ding so it can be filled. Next, use a good quality polyester or epoxy resin and mix in some chopped strands of fiberglass. This is a cosmetic layer that will fill in the low spots and bring the repaired area up to the plane of the finished surface. Mix the resin according to the manufacturer’s directions. Some manufacturers also recommend using a slow hardener in the case of epoxy resins.
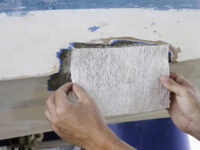
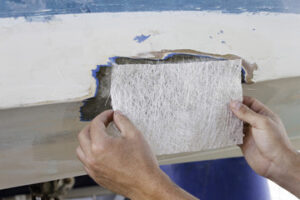
For a deeper repair, first the damaged area must be ground down to expose good fiberglass and to make sure there is no delamination present. A good test is to tap the surface with a screwdriver handle. Solid laminate will sound sharp, delamination dull. Once the bad material is removed, it is important to sand or grind the perimeter of the damaged area with a scarf angle of 12 to 1. This is the normal taper for this type of repair and will help prevent the crack from widening at the edges.
Then cut a piece of fiberglass cloth (biaxial weave) that is large enough to cover the damaged area and lay it over the bare fiberglass, making sure the edge overlaps the existing fiberglass by at least an inch or two. Again, apply the resin and chopped strand fiberglass according to the manufacturer’s instructions. After the patch is set, the high spots can be ground down with a dremel or grinder to bring them up to the plane of the finished surface. If necessary, the entire area can be sanded again with 120-grit sandpaper to remove any residual blush from the curing resin.
First, the damaged area must be cleaned. Use acetone to remove the gelcoat layer around the hole, but make sure you don’t touch the underlying fiberglass. Then, use a disc sander to smooth the patched area until it is on the same level as the surrounding fiberglass. Next, taper the edges of the hole on both the inside and outside. The edge should be centered on the thickness of the fiberglass and taper back to where the hairline cracks terminate, forming a V shape. This step is particularly important if you are repairing a hole from the inside out, as it will ensure that your fiberglass patch adheres strongly to the surrounding surface.
Now, you must prepare the hole for lamination. If you’re doing a two-sided repair, you should mask the surrounding area with a piece of polypropylene covered with plastic wrap or specialist non-stick material called peel ply. This will protect it from inadvertently applied gelcoat and errant sanding. If the hole is on a flat surface, you may not need to mask it at all.
Once the area is ready for lamination, mix your resin according to its instructions. Apply a thick coat of it to the fiberglass matting and let it set up. Once it has cured, use a putty knife to work the resin into any crevices. Now, you can add a chopped strand fiberglass layer to fill the low spots and bring the patch up to plane with the surrounding exterior surface of your fiberglass boat.
Once this is done, you’ll need to choose the type of resin for your repair. Epoxy resins are the strongest, but they don’t play well with polyesters used in production boats or with gelcoats. Vinylester resin, a kind of cross between epoxy and polyester, is often substituted for either in do-it-yourself repairs because it offers a little more resistance to moisture permeation than polyester or epoxy alone.